- Published on
Dynamically Generated OG Images in NextJS
- Authors

- Name
- James Shopland
- @jollyshopland
Open Graph (OG) images provide visual representations for content when it's shared on social media platforms. It adds extra visual appeal to a posted link, helps with branding and can entice more clicks.
Today I'm going to show you how we can generate these dynamically in NextJS 13. This means that every time we post a blog for example, we don't have to make the image ourselves, it can be done for us. It also allows us to easily change the style later if wanted.
Example
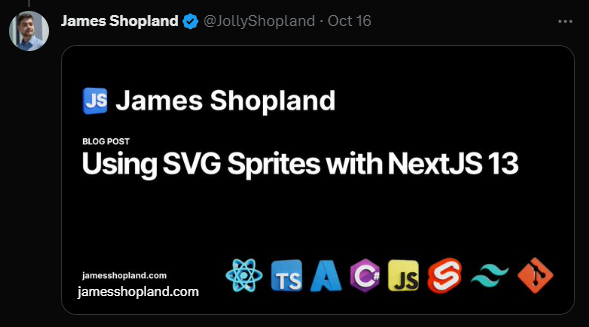
For my site I have this setup. If I share a link to twitter for one of my posts, it looks like this.
Generating the Image
1. Create the API route
The first thing we need to do is create our API route. This will be called each time a platform request the OG image and will return it.
For the app router, create the following file /app/api/og/route.tsx
Within this file we are going to import the ImageResponse which makes this all work.
We are also going to need to tell NextJS that this api route will use the "edge" runtime.
import { ImageResponse } from "next/server"

export const runtime = "edge"
If you are using the pages router, you will need to install and import this from @vercel/og.
2. Return an Image
Now that we have our route, how do we make and return an image.
To do this we simply need to define an async function called GET, and return a simple image for now.
export async function GET() {
  try {
    return new ImageResponse(<div>Hello World</div>)
  } catch (e: any) {
    return new Response("Failed to generate OG image", { status: 500 })
  }
}
Now if you navigate to https://localhost:3000/api/og you should see a simple image with the text hello in it.
3. Pull in dynamic data
To be able to use things such as the blog title, we will want to send some search params to the route to tell it what to render. So if I request the link /api/og?title="Hello", we can render the text Hello.
To do this, we will need to get the requested URL, and check if the searchParams has a title defined.
This example checks for the titles existence, if it isn't provided use a default one, if it is ensure its not longer than 100 chars (you don't need this bit if you don't want it)
export async function GET(request: Request) {
  try {
    const { searchParams } = new URL(request.url)

    const hasTitle = searchParams.has("title")
    const title = hasTitle
      ? searchParams.get("title")?.slice(0, 100)
      : "My website"

    return new ImageResponse(
      (
        <div tw="flex flex-col w-full h-full items-center justify-center bg-white">
          {title}
        </div>
      )
    )
  } catch (e: any) {
    return new Response("Failed to generate OG image", { status: 500 })
  }
}
Now if we go to the url https://localhost:3000/api/og?title=Hello%20World, we will see the words Hello World in our image. Now lets style this!
4. Styling
To style this image, we can use inline styles as you would in react by adding the style prop, or we can use Tailwind.
In order to use tailwind, we don't use className as you may be used to. Instead you want to pass the prop tw to your elements instead.
export async function GET(request: Request) {
  try {
    const { searchParams } = new URL(request.url)

    const hasTitle = searchParams.has("title")
    const title = hasTitle
      ? searchParams.get("title")?.slice(0, 100)
      : "My website"

    return new ImageResponse(
      (
        <div tw="flex flex-col w-full h-full items-center justify-center bg-white">
          <div tw="bg-gray-50 flex w-full">
            <div tw="flex flex-col md:flex-row w-full py-12 px-4 md:items-center justify-between p-8">
              <h2 tw="flex flex-col text-3xl sm:text-4xl font-bold tracking-tight text-gray-900 text-left">
                <span>Ready to dive in?</span>
                <span tw="text-indigo-600">{title}</span>
              </h2>
              <div tw="mt-8 flex md:mt-0">
                <div tw="flex rounded-md shadow">
                  <a tw="flex items-center justify-center rounded-md border border-transparent bg-indigo-600 px-5 py-3 text-base font-medium text-white">
                    Get started
                  </a>
                </div>
                <div tw="ml-3 flex rounded-md shadow">
                  <a tw="flex items-center justify-center rounded-md border border-transparent bg-white px-5 py-3 text-base font-medium text-indigo-600">
                    Learn more
                  </a>
                </div>
              </div>
            </div>
          </div>
        </div>
      )
    )
  } catch (e: any) {
    return new Response("Failed to generate OG image", { status: 500 })
  }
}
Now we have a nice OG image styled to suit our needs, but it doesn't have a nice font, lets change that!
5. Custom fonts
In order to use a custom font, we are going to want to have the font we want to use saved as a file. For example, I have added the font Inter-bold.ttf in the following folder /assets/fonts
To use this font, we need to do something that will look a little odd. We want to send a fetch request to this file, and then turn the response into an array buffer.
With the array buffer, we will want to add it to the ImageResponse configuration in a section called fonts, giving it a name and a style (normal or italic)
export async function GET(request: Request) {
  try {
    const { searchParams } = new URL(request.url)

    const hasTitle = searchParams.has("title")
    const title = hasTitle
      ? searchParams.get("title")?.slice(0, 100)
      : "My website"

    const fontData = await fetch(
      new URL("../../../assets/fonts/Inter-Bold.ttf", import.meta.url)
    ).then((res) => res.arrayBuffer())

    return new ImageResponse(
      (
        <div tw="flex flex-col w-full h-full items-center justify-center bg-white">
          <div tw="bg-gray-50 flex w-full">
            <div tw="flex flex-col md:flex-row w-full py-12 px-4 md:items-center justify-between p-8">
              <img width={64} height={64} src={imageData} />
              <h2 tw="flex flex-col text-3xl sm:text-4xl font-bold tracking-tight text-gray-900 text-left">
                <span style={{ fontFamily: "Inter" }}>Ready to dive in?</span>
                <span tw="text-indigo-600">{title}</span>
              </h2>
              <div tw="mt-8 flex md:mt-0">
                <div tw="flex rounded-md shadow">
                  <a tw="flex items-center justify-center rounded-md border border-transparent bg-indigo-600 px-5 py-3 text-base font-medium text-white">
                    Get started 👋
                  </a>
                </div>
                <div tw="ml-3 flex rounded-md shadow">
                  <a tw="flex items-center justify-center rounded-md border border-transparent bg-white px-5 py-3 text-base font-medium text-indigo-600">
                    Learn more
                  </a>
                </div>
              </div>
            </div>
          </div>
        </div>
      ),
      {
        fonts: [
          {
            name: "Inter",
            data: fontData,
            style: "normal",
          },
        ],
      }
    )
  } catch (e: any) {
    return new Response("Failed to generate OG image", { status: 500 })
  }
}
Now if you go to your route, you should see your custom font loaded into the image as well. Next we will look at some options you have for using emojis.
6. Using emojis
When you use an emoji, it will be rendered based on the device you are using. For example this 👋 will look different per device, depending on their emoji set.
When we make our image, we want to be able to tell the route what emoji set to use, as we wont know the device of the viewer.
To do this we can add a config option emoji and set it to an emoji provider. The available providers are: twemoji, blobmoji, noto, openmoji, fluent and fluentFlat
      //...previous code
      {
        fonts: [
          {
            name: "Inter",
            data: fontData,
            style: "normal",
          },
        ],
      }
7. Using local or external images
Similar to custom fonts, we have to load these by fetching and then getting an array buffer.
const imageData = await fetch(
  new URL("../../../assets/logo-64x64.png", import.meta.url)
).then((res) => res.arrayBuffer())
Then to use it, we can simply use a standard html image tag where we want it
// ...your image
<img width={64} height={64} src={imageData} />
// ...
Using the Image
To use the image, you have 2 options. Static metadata, or dynamic metadata. You will most likely want dynamic as this is the main purpose of an OG route.
In the route that you want the OG image to be for, so for my example its the blog post page, located at /app/blog/[...slug]/page.tsx
In here, I have a function called generateMetadata. You can view the documentation on this here.
export async function generateMetadata({
  params,
}: BlogPostPageProps): Promise<Metadata> {
  const details = await getPostFromParams(params)

  if (!details || !details.post) {
    return {}
  }

  const post = details.post

  const url = siteMetadata.siteUrl

  const ogUrl = new URL(`${url}/api/og`)
  ogUrl.searchParams.set("heading", post.title)
  ogUrl.searchParams.set("type", "Blog Post")
  ogUrl.searchParams.set("mode", "dark")

  return {
    // other metadata options...
    openGraph: {
      title: post.title,
      description: post.summary,
      type: "article",
      url: `${siteMetadata.siteUrl}/blog/${post.slug}`,
      images: [
        {
          url: ogUrl.toString(),
          width: 1200,
          height: 630,
          alt: post.title,
        },
      ],
    },
    twitter: {
      card: "summary_large_image",
      title: post.title,
      description: post.summary,
      images: [ogUrl.toString()],
    },
  }
}
What the above is doing is taking in the visited page param, in my case this is just the post slug. Fetching the post based on that slug, and then building the OG image url with the search parameters we can use.
Now whenever this page's link is posted, it will fetch the image from that URL.